| |
Saturday 13th October 2001Not much has happened
during the early part of October, but a couple of weeks into the month I
managed to spend a few hours one Saturday working on an axle plate.
| I spent quite some time cutting out the hole for
the motor to mount on, together with some elongated mounting holes so that I
could slide the motor up and down to tension the chain. |

|
 |
I then welded a piece of studding to a metal plate, drilled
a hole in the plate and the chassis, and used it as an adjuster to hold the
motor in position. It seemed to work quite well! |
| With the axles and sprockets in place, I mounted the wheels
on as well. It's not obvious from the photo, but there is not a lot of
clearance between the outside of the chain as it runs around the sprocket, and
the outside of the tyres. I know the tyres are part warn, but if this was a go
kart there would be less than a centimeter between the chain and the ground.
Having said that, unless the ground is particularly rough, there should be
enough clearance to make sure the tyres keep in contact with the ground. |
 |
 |
In this photo you can see some cables connected to the motor.
These were jump leads that I connected to the motor controller so that I could
see how fast I could spin the wheels. It was a very satisfying moment when I
was able to control the motor from the radio gear and see the wheels go round
in both directions without any noticeable problems. After five minutes of
spinning the wheels the only things getting warm were the motor and the jump
leads! The motor controller was nice and cool. |
|
 top top |
| |
The next task was to cut a hole in the axle bracket on the
opposite side, so that the motor could protrude through. Since I didn't have a
suitably large tank cutter, I did it the hard way with a load of holes, and a
lot of filing.
| First, a load of small holes mark out the perimeter of the
large hole. |
 |
| Then I cut the metal between each hole until the center fell
out, leaving a very ragged big hole. |
 |
| Finally after a lot of filing, a suitable smooth hole is left
through which the motor can protrude. |
 |
|
|
| With both axle brackets now in place, the complete wheel
assemble looks like this. It wasn't quite as straight forward bolting the two
brackets together as I had hoped. It's amazing what a couple of millimeters
difference can make to the alignment of the axles. When I first bolted it all
together, the axles didn't look parallel, and the chain didn't run smoothly
over the sprockets. After a close examination, I noticed that the hole I had
cut for the axle bearings were out of line by about two millimeters. I
dismantled the brackets and then filed the holes a little bit larger, and this
made all the difference. The wheels were in line, and the chain ran smoothly
over the sprockets (well, when the wheels were rotated by hand they did). |
 |
The next task was to run the motor up and see that
everything ran smoothly. Initially the sprockets made an awful noise as they
span. It sounded like there was something grating, so I took the assembly apart
and tried to realign the wheel sprockets with the motor sprocket. I put it all
back together, and no difference! I dismantled it again, re-aligned a bit more
accurately, put it together, and again there was an awful grating sound. Also
the chain seemed to be jumping and vibrating as it ran over the motor sprocket.
After a third and equally futile attempt to line things up, I wondered if the
problem was electrical rather that mechanical. I checked the radio receiver
batteries and they were looking a bit flat, so I swapped them out for a freshly
charged set. As if by magic the assembly ran as smoothly as you could ever want
it to. It seemed that the radio signals were being distorted and irregular
because of the flat batteries, and the motor was consequently jittering, giving
the impression that there was a mechanical problem.
|
top |
| |
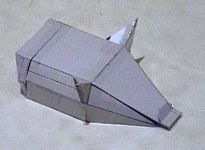
I thought it was about time that I put a bit more thought into
what the final shape of the Hassocks Hog should be. I thought a good way to get
a better idea was to build a small cardboard model, so in true Blue Peter
fashion I got out some sticky tape, some scissors and a Corn Flakes packet and
started cutting. The shape I came up with was this. The points to note are the
angled rear end that will prevent the Hog being upended and stranded sitting on
it's bum. The other things to notice are the ears. These are not only there to
look pretty, but they will make it harder for the Hog to be rolled over
sideways. It will either fall back onto its wheels, or will roll completely
over onto its back. The Hog will have a self righting tail that runs along it's
back, so that this should always be able to flip the Hog back on its wheels.
Well that's the theory anyway!
There is also the flipping mouth with a scoop at the
front, and of course not forgetting the tusks. Unfortunately I couldn't find
any suitable paper clips to use as tusks on the model, so you will have to use
your imagination!
|
top |
| |
I bolted the now complete wheel assembly onto the chassis,
connected it to the motor controller, and then tested the range of the
transmitter by walking outside the garage and across the street. With the
transmitter aerial only pulled out about a foot, and the receiver aerial still
tied up in the small bundle it arrived in the box with, I was still able to
control the motor from the other side of the road (about 30 feet). This was
quite reassuring, so hopefully I won't have too many radio problems later on.
Time will tell!
I made a start on cutting the bearing holes in the second set of
axle brackets. This time, however, to avoid the alignment problems I had with
the first set of axles, I bolted the two plates together and cut the holes out
of both of them at the same time. This made the job a bit long winded, but in
the end I had the holes in exactly the same places on both aluminium plates. It
took a good couple of hours of drilling and filling to get the job done, and by
this time there was not enough time to get anything else done for the day.
|
top |
| |
|
|