October 2002
Sunday 13th October 2002
I tried out both MOSFET bricks today on a low powered motor. Everything seemed to be going well, and the bricks didn't even get warm. The next test it to try them both on more powerful motors, but I have little doubt that they will work okay.
Monday 14th October 2002
I've been mulling over for some time, which motors to use to replace my inefficient winch motors. I wanted to run the motors on at least a 24v system for more power, but wasn't sure if I wanted to play it safe and use 24v rated motors. The alternative was to go for 12v motors and overrun them at 24 volts to get (in theory) four times the power. I was looking at the Bosch 630 watt motors and reckoned that my MOSFET bricks could handle the stall currents of 500 amps. What I wasn't sure about was whether the motors themselves could handle the extra current without suffering permanent damage.
I knew that George Frances used 400watt, 12v motors in Chaos 2 that he ran at 24volts without problems, so I sent him an email asking him for his thoughts. He said he didn't know of anyone who had actually overrun these motors at 24volts (although he has been asked the same question by other people), but his gut feeling was that it would be okay. But in any case, he would be interested to know what happened if I did opt to use these motors in this situation. Armed with this "gut feeling" I placed an order with technobots for a couple of Bosch 12v, 630watt motors.
For the last couple of weeks I have been thinking about the pneumatics I want to use on the flipper. The technical guide notes from the M2 robot site were very useful, but I wanted to get a better feeling for how the flipper would work, and what sizes of components to use. In an effort to simulate the action of the flipper, I have been working on a spreadsheet that gives graphs of the pressure in the ram, and the height of a mass as it is thrown from the flipper.

The spreadsheet was now at version two, so I sent a copy off to the "Steel Avenger" team, the "Alien" team, and the "M2" team for their comments. If they think it has value and could be useful, I will put it on my website for people to download. Watch this space!
Friday 18th October 2002
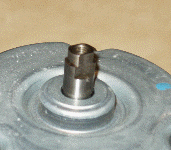
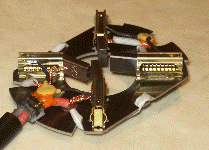
| The two Bosch motors I ordered from Technobots arrived today. I was surprised how much bigger the diameter of the case was compared to my old winch motors, but I also noticed that the case of the Bosch's weren't as sturdy. |  |
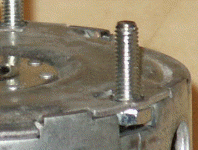 |
I had read from several roboteers websites that the flange plates were not particularly well secured to the rest of the housing, and many people put a few beads of welding at the joins to make them more robust. From the photo you can see that there are castellations on the outer case that have one edge burred over (probably with one blow of a chisel!) to wedge them on the flange plate. I must admit that this will probably be one of the first jobs I tackle after having spun the motor up on the motor controller. |
I decided to check the motors has survived the journey through the post, so I connected them across a 12volt battery and span them up. They both ran fine, which was a great relief. They certainly had a "kick" when I first connected them to the battery, and I had to hold them down hard to stop them jumping off the workbench. The initial sparks as I connected them to the batteries were not as bad as the winch motors, nor was the current they drew when they had got up to full speed.
I now connected them to the motor controller and ran then for a few minutes one way and then the other. It was noticeable that they ran faster in one direction that the other. This might cause problems with steering, but I thought this could be overcome in one of two ways. Firstly the gyro in the controller circuit would try to correct any motor speed variation, provided the speed difference wasn't too great. This was the easy option.
| The other option that crossed my mind was that I could take the drive off the motors from different sides. The shaft protrudes out of both ends of the motor, so by mounting the sprockets on different ends for the left and right sides, they should spin at the same speed, albeit faster in one direction that the other. The ends of the shaft were not the same shape, so this would not be my preference option at the moment. |  |
 |
Sunday 21st October 2002
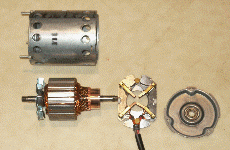
| Like all motors used on robots, it's a good idea to fit suppressors to them. On my winch motors I had fitted a 0.01 microF capacitor across each pair of brushes, and never had any interference problems from them. I decided to do the same thing with the Bosch motors so started to dismantle one of them carefully. The job wasn't difficult since there were only three bolts holding the end cap on, and with this removed, everything could be extracted. |  |
One thing that did strike me straight away whilst removing the armature, was the strength of the magnets in the Bosch motors compared to those in my old winch motors. The Bosch motor had substantially stronger magnets, and it was quite an effort to pull the armature out of the casing.
There was plenty of room on the brush assembly plate to mount the suppressors. Once the leads were soldered onto the brush holders, I held the capacitor's body in situ with some silicon gasket sealant, to stop vibrations eventually snapping the leads off.
 |
 |
| The next job to do was put a bead of welding along the edge of the flange and the outer casing. The motors have a reputation for this flange being weakly attached to the case, so like many roboteers, I ran a quick bead along the joint to make sure they didn't part company during a battle. |  |
After this, I really wanted to see if the motors would run okay on 24volts, and whether my MOSFETs could handle the extra current. To save potentially blowing up my newly assembled MOSFET bricks, I decided to test the motors out using one of my few surviving bricks from Hassock Hog 1. I wired one brick to the motor controller, and used this brick to provide a controlled -ve battery feed to the motor. I then connected 24volts to the other side of the motor and was ready to try the motor out.
I gingerly wound the speed up, half expecting one of the MOSFETs to self-destruct and blow itself off the brick. However, the motor ran up to full speed, which was quite a bit faster that it ran on 12volts (what a surprise!), and the MOSFETs remained cool and in place on the brick. I kept the motor going for a couple of minutes, and then stopped it to check the temperature of both the motor and brick. I was pleased to observer that the brick was only mildly warm, certainly not "egg frying" hot like it was when I ran my winch motors at 24volts. Likewise the motor survived fine, and was even cooler that the MOSFETs! Admittedly the motor was not under any load, but with neither the motor or MOSFETs getting anything more that mildly warm, I was happy now to continue in earnest on the 24V motor controller build.
Saturday 26th October 2002
I've been thinking a bit about how I am going to mount the drive sprocket on the Bosch motors. The problem I have is that the sprocket I want to use is slightly longer than the shaft stub protruding from the motor. I could have a shaft made that screws onto the stub and extends it long enough to mount the sprocket on, but I feel the overhang of this shaft will be too much without some support at the end of the shaft. What I think I will do is make a shaft that can be mounted independently on a couple of plummer block bearings fixed to the chassis. I can then join the motor stub to this shaft through some type of coupling. In this way the transverse load from the chain will be supported by the bearings. I ordered some Motor couplings from RS that looked like they might do the job.
Tuesday 29th October 2002
| The motor coupling arrived from RS, but I was a bit disappointed with the way it secured to the shaft. The coupling was a friction clamp type and relied on a pinch bolt to clamp it firmly onto the shaft. The bolt unfortunately was only M3, which I felt was too small to be tightened up as much as I wanted. There was going to be a fair bit of torque going through the coupling, and a pure friction type just wasn't going to hack it, so it's was back to the catalogue to have a look for some other alternatives. | 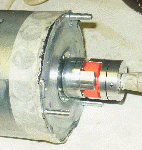 |